More actions
No edit summary |
No edit summary |
||
| (9 intermediate revisions by 2 users not shown) | |||
| Line 1: | Line 1: | ||
== G Phosani == | |||
'''Note:''' This | '''Note:''' This script is specifically designed for the solo instanced version of [https://oldschool.runescape.wiki/w/Phosani%27s_Nightmare Phosani's Nightmare], not the group encounter. | ||
== Requirements == | === Requirements === | ||
* | * '''Quest:''' | ||
* | * [https://oldschool.runescape.wiki/w/Priest_in_Peril Priest in Peril] (to access [https://oldschool.runescape.wiki/w/Morytania Morytania]) - REQUIRED | ||
* [https://oldschool.runescape.wiki/w/A_Taste_of_Hope A Taste of Hope] (for [https://oldschool.runescape.wiki/w/Drakan%27s_medallion quick teleport]) - Recommended | |||
== | === Recommended Stats === | ||
* 90+ [https://oldschool.runescape.wiki/w/Attack Attack] | |||
* [https://oldschool.runescape.wiki/w/Attack Attack] | * 90+ [https://oldschool.runescape.wiki/w/Strength Strength] | ||
* 85+ [https://oldschool.runescape.wiki/w/Defence Defence] | |||
* [https://oldschool.runescape.wiki/w/Defence Defence] | * 75+ [https://oldschool.runescape.wiki/w/Magic Magic] | ||
* [https://oldschool.runescape.wiki/w/Magic Magic] | * 90+ [https://oldschool.runescape.wiki/w/Hitpoints Hitpoints] | ||
* [https://oldschool.runescape.wiki/w/Hitpoints Hitpoints] | * 70+ [https://oldschool.runescape.wiki/w/Prayer Prayer] | ||
* [https://oldschool.runescape.wiki/w/Prayer Prayer] | |||
'''Important:''' This is an endurance fight - average gear will result in 15+ minute kill times. | |||
=== Configuration Guide === | |||
=== Trip Settings === | === Trip Settings === | ||
[[File:PNMtrip.png]] | [[File:PNMtrip.png|center|400px]] | ||
* | * [X] Enable [https://oldschool.runescape.wiki/w/Thralls Thralls] | ||
* | * [X] Enable [https://oldschool.runescape.wiki/w/Death_charge Death Charge] (special attack regeneration) | ||
* '''Sanfew Serums:''' | * '''Sanfew Serums:''' 2+ recommended (2 kill minimum) | ||
* | * Default settings are optimized for most accounts | ||
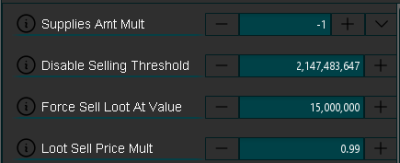
=== Supply | === Supply Setup === | ||
[[File:Pnmsupply.png]] | [[File:Pnmsupply.png|center|400px]] | ||
* | * [X] [https://oldschool.runescape.wiki/w/Imbued_heart Imbued heart]/[https://oldschool.runescape.wiki/w/Saturated_heart Saturated heart] support | ||
* Automatic potion dose management | |||
* Dynamic food selection | |||
=== Restock Configuration === | |||
<div style="text-align: center;"> | |||
[[File:Pnmrestock.png|400px]] | |||
=== Kill/Boss Settings === | |||
[[File:PNMKillsettings.png|center]] | |||
== Tips == | |||
* Start with | {| class="wikitable" style="margin: auto; width: auto;" | ||
* Monitor | ! Setting | ||
* | ! Recommended Value | ||
! Description | |||
|- | |||
| '''Disable Selling Threshold''' | |||
| 400K GP | |||
| Prevents selling gear above this value | |||
|- | |||
| '''Force Sell Loot''' | |||
| 100M+ GP | |||
| Set high to manual sell loot | |||
|} | |||
</div> | |||
=== General Tips === | |||
* '''Kill testing:''' Run 5-10 practice kills before optimizing settings | |||
* '''Gear Progression:''' Start with budget setup before investing | |||
* '''Loot Strategy:''' Keep thresholds high for rare items | |||
* '''Performance:''' Monitor kill times to adjust supplies | |||
=== See Also === | |||
* [https://oldschool.runescape.wiki/w/Phosani%27s_Nightmare/Strategies Official OSRS Strategy Guide] | |||
* [https://oldschool.runescape.wiki/w/Inquisitor%27s_armour Inquisitor's armour] (best-in-slot gear) | |||
<Small>With the gear changes and the way Magic damage % is calculated, some lower tier gear may be more viable now</Small> | |||
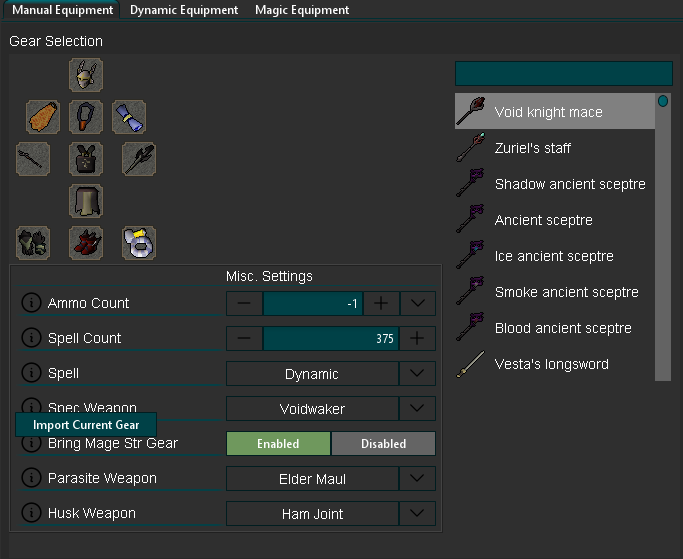
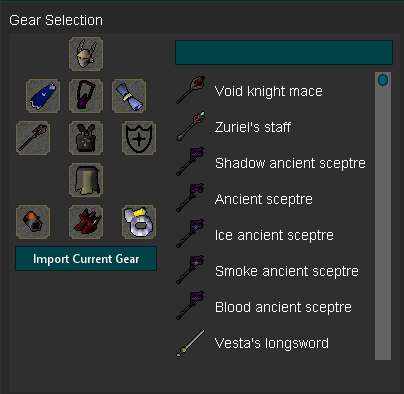
== Example Gear Loadout == | |||
[[File:ExampleMeleeLoadoutPNM.png|center]] | |||
[[File:PNMMagic.png|center]] | |||
=== Gear Recommendations === | |||
{| class="mw-collapsible mw-collapsed wikitable sortable" style="width:100%; text-align:center;" | |||
! colspan="4" style="background:#4CAF50; color:white;" | [https://oldschool.runescape.wiki/w/Phosani%27s_Nightmare Phosani's Nightmare] Gear Loadouts | |||
|- | |||
! Slot 🏷️ | |||
! Budget (~5M) 💰 | |||
! Mid-Tier (~50M) 💎 | |||
! Best-in-Slot (150M+) 🔮 | |||
|- | |||
| '''Helmet ⛑️''' | |||
| [https://oldschool.runescape.wiki/w/Neitiznot_faceguard 🛡️ Neitiznot faceguard]<br>or<br>[https://oldschool.runescape.wiki/w/Serpentine_helm 🐍 Serpentine helm] | |||
| [https://oldschool.runescape.wiki/w/Torva_full_helm ⚔️ Torva full helm]<br>or<br>[https://oldschool.runescape.wiki/w/Inquisitor%27s_great_helm ✝️ Inquisitor's great helm] | |||
| [https://oldschool.runescape.wiki/w/Torva_full_helm ⚔️ Torva full helm]<br> | |||
|- | |||
| '''Cape 🪂''' | |||
| [https://oldschool.runescape.wiki/w/Fire_cape 🔥 Fire cape]<br>or<br>[https://oldschool.runescape.wiki/w/Ardougne_cloak 🏰 Ardougne cloak 4] | |||
| [https://oldschool.runescape.wiki/w/Infernal_cape 😈 Infernal cape] | |||
| [https://oldschool.runescape.wiki/w/Infernal_cape 😈 Infernal cape] | |||
|- | |||
| '''Amulet 📿''' | |||
| [https://oldschool.runescape.wiki/w/Amulet_of_torture ⛓️ Amulet of torture]<br>or<br>[https://oldschool.runescape.wiki/w/Amulet_of_fury 💢 Amulet of fury] | |||
| [https://oldschool.runescape.wiki/w/Amulet_of_torture ⛓️ Amulet of torture] | |||
| [https://oldschool.runescape.wiki/w/Amulet_of_torture ⛓️ Amulet of torture]<br> | |||
|- | |||
| '''Weapon ⚔️''' | |||
| [https://oldschool.runescape.wiki/w/Abyssal_tentacle 🦑 Abyssal tentacle]<br>or<br>[https://oldschool.runescape.wiki/w/Blade_of_saeldor 💎 Blade of saeldor] | |||
| [https://oldschool.runescape.wiki/w/Ghrazi_rapier 🗡️ Ghrazi rapier]<br>or<br>[https://oldschool.runescape.wiki/w/Scythe_of_vitur ☠️ Scythe of vitur] | |||
| [https://oldschool.runescape.wiki/w/Scythe_of_vitur ☠️ Scythe of vitur]<br> | |||
|- | |||
| '''Body 🦺''' | |||
| [https://oldschool.runescape.wiki/w/Fighter_torso 💪 Fighter torso]<br>or<br>[https://oldschool.runescape.wiki/w/Bandos_chestplate ⚔️ Bandos chestplate] | |||
| [https://oldschool.runescape.wiki/w/Inquisitor%27s_hauberk ✝️ Inquisitor's hauberk]<br>or<br>[https://oldschool.runescape.wiki/w/Torva_platebody ⚔️ Torva platebody] | |||
| [https://oldschool.runescape.wiki/w/Torva_platebody ⚔️ Torva platebody]<br> | |||
|- | |||
| '''Legs 👖''' | |||
| [https://oldschool.runescape.wiki/w/Bandos_tassets ⚔️ Bandos tassets]<br>or<br>[https://oldschool.runescape.wiki/w/Obsidian_platelegs 🖤 Obsidian platelegs] | |||
| [https://oldschool.runescape.wiki/w/Inquisitor%27s_plateskirt ✝️ Inquisitor's plateskirt]<br>or<br>[https://oldschool.runescape.wiki/w/Torva_platelegs ⚔️ Torva platelegs] | |||
| [https://oldschool.runescape.wiki/w/Torva_platelegs ⚔️ Torva platelegs]<br> | |||
|- | |||
| '''Gloves 🧤''' | |||
| [https://oldschool.runescape.wiki/w/Barrows_gloves 🧿 Barrows gloves]<br>or<br>[https://oldschool.runescape.wiki/w/Ferocious_gloves 🐲 Ferocious gloves] | |||
| [https://oldschool.runescape.wiki/w/Ferocious_gloves 🐲 Ferocious gloves] | |||
| [https://oldschool.runescape.wiki/w/Ferocious_gloves 🐲 Ferocious gloves] | |||
|- | |||
| '''Boots 👢''' | |||
| [https://oldschool.runescape.wiki/w/Dragon_boots 🐉 Dragon boots]<br>or<br>[https://oldschool.runescape.wiki/w/Guardian_boots 🛡️ Guardian boots] | |||
| [https://oldschool.runescape.wiki/w/Primordial_boots 🔥 Primordial boots] | |||
| [https://oldschool.runescape.wiki/w/Primordial_boots 🔥 Primordial boots] | |||
|- | |||
| '''Ring 💍''' | |||
| [https://oldschool.runescape.wiki/w/Berserker_ring_(i) ⚔️ Berserker ring (i)]<br>or<br>[https://oldschool.runescape.wiki/w/Treasonous_ring 👑 Treasonous ring] | |||
| [https://oldschool.runescape.wiki/w/Ultor_ring 💢 Ultor ring] | |||
| [https://oldschool.runescape.wiki/w/Ultor_ring 💢 Ultor ring]<br> | |||
|- | |||
| '''Spec Weapon 💥''' | |||
| [https://oldschool.runescape.wiki/w/Dragon_dagger 🐉 Dragon dagger (p++)]<br>or<br>[https://oldschool.runescape.wiki/w/Dragon_claws 🐲 Dragon claws] | |||
| [https://oldschool.runescape.wiki/w/Dragon_claws 🐲 Dragon claws] | |||
| [https://oldschool.runescape.wiki/w/Voidwaker ⚡ Voidwaker]<br>or<br>[https://oldschool.runescape.wiki/w/Dragon_claws 🐲 Dragon claws] | |||
|- | |||
| '''Ammo 🏹''' | |||
| [https://oldschool.runescape.wiki/w/Rada%27s_blessing 🙏 Rada's blessing 4]<br>(if using bow) | |||
| [https://oldschool.runescape.wiki/w/Rada%27s_blessing 🙏 Rada's blessing 4]<br>(if using bow) | |||
| [https://oldschool.runescape.wiki/w/Rada%27s_blessing 🙏 Rada's blessing 4]<br>(if using bow) | |||
|- | |||
| '''Inventory 🎒''' | |||
| [https://oldschool.runescape.wiki/w/Super_combat_potion ⚗️ Super combat]<br>[https://oldschool.runescape.wiki/w/Sanfew_serum 💊 Sanfew serum]<br>[https://oldschool.runescape.wiki/w/Saradomin_brew 🍶 Saradomin brew]<br>[https://oldschool.runescape.wiki/w/Super_restore 🔄 Super restore] | |||
| [https://oldschool.runescape.wiki/w/Super_combat_potion ⚗️ Super combat]<br>[https://oldschool.runescape.wiki/w/Sanfew_serum 💊 Sanfew serum]<br>[https://oldschool.runescape.wiki/w/Saradomin_brew 🍶 Saradomin brew]<br>[https://oldschool.runescape.wiki/w/Super_restore 🔄 Super restore]<br>[https://oldschool.runescape.wiki/w/Anglerfish 🐟 Anglerfish] | |||
| [https://oldschool.runescape.wiki/w/Super_combat_potion ⚗️ Super combat]<br>[https://oldschool.runescape.wiki/w/Sanfew_serum 💊 Sanfew serum]<br>[https://oldschool.runescape.wiki/w/Saradomin_brew 🍶 Saradomin brew]<br>[https://oldschool.runescape.wiki/w/Super_restore 🔄 Super restore]<br>[https://oldschool.runescape.wiki/w/Anglerfish 🐟 Anglerfish]<br>[https://oldschool.runescape.wiki/w/Imbued_heart 💓 Imbued heart] | |||
|- | |||
| colspan="4" style="text-align:left;" | | |||
'''📝 Notes:''' | |||
* 💰 Budget setup assumes 85+ [https://oldschool.runescape.wiki/w/Combat combat stats] | |||
* 💎 Mid-tier assumes 90+ [https://oldschool.runescape.wiki/w/Combat combat stats] | |||
* 🔮 BIS assumes max [https://oldschool.runescape.wiki/w/Combat combat stats] and includes optimal switches | |||
* 👥 All setups should bring [https://oldschool.runescape.wiki/w/Thrall 👻 Thralls] and [https://oldschool.runescape.wiki/w/Death_charge ⚡ Death Charge] if available | |||
* 🏰 [https://oldschool.runescape.wiki/w/Drakan%27s_medallion Drakan's medallion] is recommended for all tiers | |||
|} | |||
[[Category:Instanced]] | |||
[[Category:PVM]] | |||
Latest revision as of 08:34, 6 August 2025
G Phosani
Note: This script is specifically designed for the solo instanced version of Phosani's Nightmare, not the group encounter.
Requirements
- Quest:
 * Priest in Peril (to access Morytania) - REQUIRED
 * A Taste of Hope (for quick teleport) - Recommended
Recommended Stats
Important: This is an endurance fight - average gear will result in 15+ minute kill times.
Configuration Guide
Trip Settings
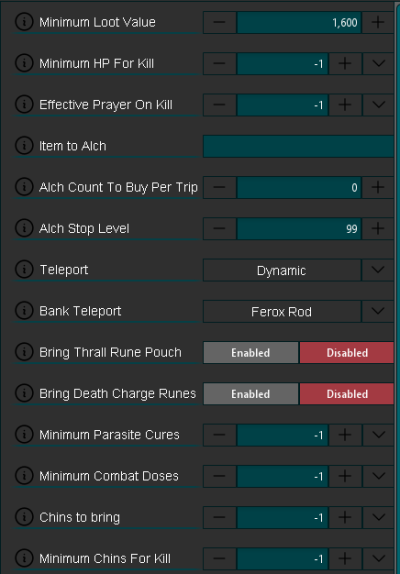
- [X] Enable Thralls
- [X] Enable Death Charge (special attack regeneration)
- Sanfew Serums: 2+ recommended (2 kill minimum)
- Default settings are optimized for most accounts
Supply Setup
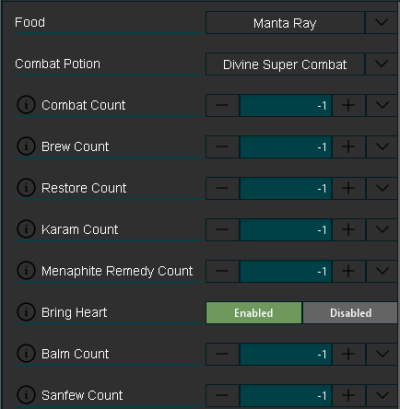
- [X] Imbued heart/Saturated heart support
- Automatic potion dose management
- Dynamic food selection
Restock Configuration
Kill/Boss Settings
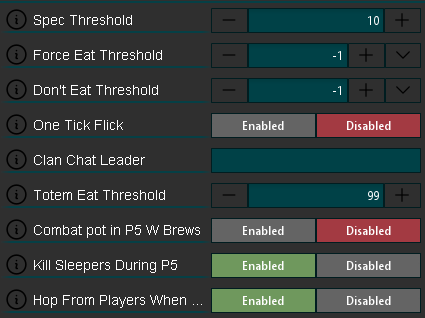
| Setting | Recommended Value | Description |
|---|---|---|
| Disable Selling Threshold | 400K GP | Prevents selling gear above this value |
| Force Sell Loot | 100M+ GP | Set high to manual sell loot |
General Tips
- Kill testing: Run 5-10 practice kills before optimizing settings
- Gear Progression: Start with budget setup before investing
- Loot Strategy: Keep thresholds high for rare items
- Performance: Monitor kill times to adjust supplies
See Also
- Official OSRS Strategy Guide
- Inquisitor's armour (best-in-slot gear)
With the gear changes and the way Magic damage % is calculated, some lower tier gear may be more viable now
Example Gear Loadout
